Chapter 4 Essential Unix/Linux Terminal Knowledge
Unix was developed at AT&T Bell Labs in the 1960s. Formally “UNIX” is a trademarked operating system, but when most people talk about “Unix” they are talking about the shell, which is the text-command-driven interface by which Unix users interact with the computer.
The Unix shell has been around, largely unchanged, for many decades because it is awesome. When you learn it, you aren’t learning a fad, but, rather, a mode of interacting with your computer that has been time tested and will likely continue to be the lingua franca of large computer systems for many decades to come.
For bioinformatics, Unix is the tool of choice for a number of reasons: 1) complex analyses of data can be undertaken with a minimum of words; 2) Unix allows automation of tasks, especially ones that are repeated many times; 3) the standard set of Unix commands includes a number of tools for managing large files and for inspecting and manipulating text files; 4) multiple, successive analyses upon a single stream of data can be expressed and executed efficiently, typically without the need to write intermediate results to the disk; 5) Unix was developed when computers were extremely limited in terms of memory and speed. Accordingly, many Unix tools have been well optimized and are appropriate to the massive genomic data sets that can be taxing even for today’s large, high performance computing systems; 6) virtually all state-of-the-art bioinformatic tools are tailored to run in a Unix environment; and finally, 7) essentially every high-performance computer cluster runs some variant of Unix, so if you are going to be using a cluster for your analyses (which is highly likely), then you have gotta know Unix!
4.1 Getting a bash shell on your system
A special part of the Unix operating system is the “shell.” This is the system that interprets commands from the user. At times it behaves like an interpreted programming language, and it also has a number of features that help to minimize the amount of typing the user must do to complete any particular tasks. There are a number of different “shells” that people use. We will focus on one called “bash,” which stands for the “Bourne again shell.” Many of the shells share a number of features.
Many common operating systems are built upon Unix or upon Linux—an open-source flavor of Unix that is, in many scenarios, indistinguishable. Hereafter we will refer to both Unix and Linux as “Unix” systems). For example all Apple Macintosh computers are built on top of the Berkeley Standard Distribution of Unix and bash is the default shell. Many people these days use laptops that run a flavor of Linux like Ubuntu, Debian, or RedHat. Linux users should ensure that they are running the bash shell. This can be done by typing “bash” at the command line, or inserting that into their profile. To know what shell is currently running you can type:
at the Unix command line. If you are running bash the result should
be
PCs running Microsoft Windows are something of the exception in the computer world, in that they are not running an operating system built on Unix. However, Windows 10 now allows for a Linux Subsystem to be run. For Windows, it is also possible to install a lightweight implementation of bash (like Git Bash). This is helpful for learning how to use Unix, but it should be noted that most bioinformatic tools are still difficult to install on Windows.
Mac computers used to come from the store configured to use bash as the default
shell; however, since the Catalina OS, Apple now sets a different shell—the Z-shell,
or zsh—as the default. This is apparently because of some changes to bash’s
license status. However, an old version of bash is still on the Apple system, and it
can be set as the default (which is what I do, because bash is what is used in
most bioinformatics). Doing so involves changing the default shell with the chsh command (chsh -s /bin/bash) and then adding a line that looks like:
to your ~/.bashrc file. (This will all make more sense after you have digested
the contents of this chapter.)
4.2 Navigating the Unix filesystem
Most computer users will be familiar with the idea of saving documents into “folders.” These folders are typically navigated using a “point-and-click” interface like that of the Finder in Mac OS X or the File Explorer in a Windows system. When working in a Unix shell, such a point-and-click interface is typically not available, and the first hurdle that new Unix users must surmount is learning to quickly navigate in the Unix filesystem from a terminal prompt. So, we begin our foray into Unix and its command prompt with this essential skill.
When you start a Unix shell in a terminal window you get a command prompt that might look something like this:
or, perhaps something as simple as:
or maybe something like:
We will adopt the convention in this book that, unless we are intentionally doing something fancier, the Unix command prompt is given by a percent sign, and this will be used when displaying text typed at a command prompt, followed by output from the command. For example
shows that I issued the Unix command pwd, which instructs the computer to
print working directory, and the computer responded by printing
/Users/eriq, which, on my Mac OS X system is my home directory.
In Unix parlance, rather than speaking of “folders,” we call
them “directories;” however, the two are essentially the same thing.
Every user
on a Unix system has a home directory. It is the domain on a shared computer
in which the user has privileges to create and delete files and do work.
It is where most of your work will happen. When you are working in the Unix
shell there is a notion of a
current working directory—that is to say, a place within the hierarchy of
directories where you are “currently working.” This will become more concrete
after we have encountered a few more concepts.
/Users/eriq is what is known as an absolute path, as it provides the
“address” of my home directory, eriq, on my laptop, starting from the root
of the filesystem. Every Unix computer system has a root directory (you can
think of it as the “top-most” directory in a hierarchy), and on every Unix system
this root directory always has the special name, /. The address
of a directory relative to the root is specified by starting with the root (/)
and then naming each subsequent directory that you must go inside of in order to
get to the destination, each separated by a /. For example, /Users/eriq
tells us that we start at the root (/) and then we go into the Users directory
(Users) and then, from there, into the eriq directory. Note that / is used to mean the root
directory when at the beginning of an absolute path, but in the remainder of the path
its meaning is different: it is used merely as a separator
between directories nested within one another. Figure 4.1 shows
an example hierarchy of some of the directories that are found on the author’s
laptop.
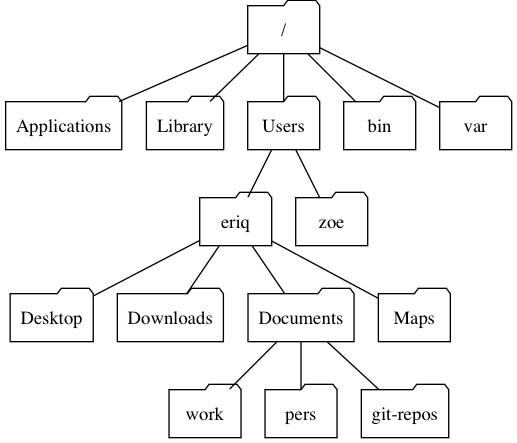
FIGURE 4.1: A partial view of the directories on the author’s laptop.
From this perspective it is obvious that the directory eriq lives inside Users, and also that, for example,
the absolute path of the directory git-repos would be /Users/eriq/Documents/git-repos.
Absolute paths give the precise location of a directory relative to the root of the filesystem,
but it is not always convenient, nor appropriate, to work entirely with absolute paths.
For one thing, directories that are deeply nested within many others can have long and unwieldy
absolute path names that are hard to type and can be difficult to remember. Furthermore, as we will
see later in this book, absolute paths are typically not reproducible from one computer’s
filesystem to another. Accordingly, it is more common to give the address of directories using
relative paths. Relative paths work much like absolute paths; however, they do not start with
a leading /, and hence they do not take as their
starting point the root directory. Rather, their starting point is implicitly taken
to be the current working directory. Thus, if the current working directory is
/Users/eriq, then the path Documents/pers is a relative path to the
pers directory, as can again be seen in Figure 4.1.
The special relative path symbol .. means “the directory that is one level higher up
in the hierarchy.” So, if the current working directory were /Users/eriq/Documents/git-repos,
then the path .. would mean /Users/eriq/Documents, the path
../work gives the directory /Users/eriq/Documents/work, and, by using two or more .. symbols
separated by forward slashes, we
can even go up multiple levels in the hierarchy: ../../../zoe is a relative path for
/Users/zoe, when the current working directory is /Users/eriq/Documents/git-repos.
When naming paths, another
useful Unix shorthand is ~ (a tilde) which denotes the user’s home directory. This is particularly
useful since most of your time in a Unix filesystem will be spent in a directory within your
home directory. Accordingly, ~/Documents/work is a quick shorthand for
/Users/eriq/Documents/work. This is essential practice if you are working on a large shared computing
resource in which the absolute path to your home directory might be changed by the
system administrator when restructuring the filesystem.
/Users/eriq/Documents/git-repos
is git-repos. And the basename of ../../Users is Users.
4.2.1 Changing the working directory with cd
When you begin a Unix terminal session, the current working
directory is set, by default, to your home directory. However, when you are doing
bioinformatics or otherwise hacking on the command line, you will typically
want to be “in another directory” (meaning you will want the current working
directory set to some other directory). For this, Unix provides the cd command, which
stands for change directory. The syntax is simple:
cd path
where path is an absolute or a relative path. For example, to
get to the git-repos directory from my home directory would require
a simple command: cd Documents/git-repos. Once there, I could change to
my Desktop directory with cd ../../Desktop. Witness:
% pwd
/Users/eriq
% cd Documents/git-repos/
% pwd
/Users/eriq/Documents/git-repos
% cd ../../Desktop
% pwd
/Users/eriq/DesktopOnce you have used cd, the working directory of your current shell will
remain the same no matter how many other commands you issue,
until you invoke the cd command another time and change
to a different directory.
If you give the cd command with no path specified, your working directory
will be set to your home directory. This is super-handy if you have been
exploring the levels of a Unix filesystem above your home directory and cannot
remember how to get back to your home directory. Just remember that
will get you back home.
Another useful shortcut is to supply - (a hyphen) as the path to cd. This will
change the working directory back to where you were before your last invocation
of cd, and it will tell you which directory you have returned to. For example, if you start in /Users/eriq/Documents/git-repos and then
cd to /bin, you can get back to git-repos with cd - like so:
% pwd
/Users/eriq/Documents/git-repos
% cd /bin/
% pwd
/bin
% cd -
/Users/eriq/Documents/git-repos
% pwd
/Users/eriq/Documents/git-repos
Note that the output of cd - is the newly-returned-to current working directory.
4.2.2 Updating your command prompt
When you are buzzing around in your filesystem, it is often difficult to remember
which directory you are in. You can always type pwd to figure that out,
but the bash shell also provides a way to print the current working directory
within your command prompt.
For example, the command:
redefines the command prompt to be the basename of the current directory surrounded
by brackets and followed by --%:
% pwd
/Users/eriq/Documents/git-repos
% PS1='[\W]--% '
[git-repos]--% cd ../
[Documents]--% cd ../
[~]--% cd ../
[Users]--%
This can make it considerably easier to keep track of where you are in your file system.
We will discuss later how to invoke this change automatically in every terminal session when we talk about customizing environments in Section 4.5.
4.2.3 TAB-completion for paths
Let’s be frank…typing path names in order to change from one directory to another can feel
awfully tedious, especially when your every neuron is screaming, “Why can’t I just have a friggin’ Finder
window to navigate in!” Do not despair. This is a normal reaction when you first start using Unix.
Fortunately, Unix file-system navigation can be made much less painful (or even enjoyable)
for you by becoming a master of TAB-completion. Imagine the Unix shell is watching
your every keystroke and trying to guess what you are about to type. If you type the first part
of a directory name after a command, like cd and then hit the TAB key, the shell will respond
with its best guess of how you want to complete what you are typing.
Take the file hierarchy of Figure 4.1, and imagine that we are in the root
directory. At that point, if we type cd A, the shell will think “Ooh! I’ll bet they want to
change into the directory Applications because that is the only directory that starts with A. Sure enough,
if you hit TAB, the shell adds to the command line so that cd A becomes cd Applications/
and the cursor is still waiting for further input at the end of the command.
Boom! That was way easier (and more accurate) than typing all those letters after A.
Developing a lightning-fast TAB-completion trigger finger is, quite seriously, essential to surviving and thriving in Unix. Use your left pinky to hit TAB. Hone your skills. Make sure you can hit TAB with your eyes closed. TAB early and TAB often!
Once you can hit TAB instantly from within the middle of any phrase, you will also want to understand a few simple rules of TAB completion:
If you try TAB-completing a word on the command line that is not at the beginning of the command line (i.e., you are typing a word after a command like
cd), then the shell tries to complete the word with a directory name or a file name.The shell will only complete an entire directory or file name if the name uniquely matches the first part of the path that has been entered. In our example, there were no other directories than
Applicationsin/that start withA, so the shell was certain that we must have been going forApplications.If there is more than one directory or file name that matches what you have already typed, then, the first time you hit TAB, nothing happens, but the second time you hit TAB, the shell will print a list of names that match what you have written so far. For example, in our Figure 4.1 example, hitting TAB after typing
cd ~/Ddoes nothing. But the second time we hit TAB we get a list of matching names:So, if we are heading to
Documentswe can see that addingocto our command line, to createcd Docwould be sufficient to allow the shell to uniquely and correctly guess where we are heading.cd Docwill TAB-complete intocd Documents/If there are multiple directory or file names that match the current command line, and they share more letters than those currently on the command line, TAB-completion will complete the name to the end of the shared portion of the name. An example helps: let’s say I have the following two directories with hideously long names in my
Downloadsfolder:WIFL.rep_indiv_est.mixture_collection.count.gr8-results WIFL.rep_indiv_est.mixture_collection.count-resultsThen, TAB completing on
~/Downloads/WIFL.repwill partially complete so that the prompt and command look like:and hitting TAB twice gives:
% cd ~/Downloads/WIFL.rep_indiv_est.mixture_collection.count
WIFL.rep_indiv_est.mixture_collection.count-results
WIFL.rep_indiv_est.mixture_collection.count.gr8-results
At this point, adding
-and TAB completing will give the first of those directories.
The last example shows just how much typing TAB completion can save you. So, don’t be shy about hitting that TAB key. When navigating your filesystem (or writing longer command lines that require paths of files) you should consider hitting TAB after every 1 or 2 letters. In routine work on the command line, probably somewhere around 25% or more of my keystrokes are TABs. Furthermore, a TAB is never going to execute a command, and it typically won’t complete to a path that you don’t want (unless you got the first part of its name wrong), so there isn’t any risk to hitting TAB all the time.
4.2.4 Listing the contents of a directory with ls
So far we have been focusing mostly on directories. However, directories themselves
are not particularly interesting—they are merely containers. It is the files inside of directories
that we typically work on. The command ls lists the contents—typically files or
other directories—within a directory.
Invoking the ls command without any other arguments (without anything after it)
returns the contents of the current working directory. In our example,
if we are in /Users then we get:
By default, ls gives output in several columns of text, with the directory contents
sorted lexicographically. For example, the following is output from the ls command
in a directory on a remote Unix machine:
% ls
bam                      map-sliced-fastqs-etc.sh
bam-slices               play
bwa-run-list.txt         REDOS-map-sliced-fastqs-etc.sh
fastq-file-prefixes.txt  sliced
fqslice-22.error         slice-fastqs.sh
fqslice-22.log           slicer-lines.txt
map-etc.sh               Slicer-Logs-summary.txt
The first line shows the command prompt and the command: % ls, and the remainder is
the output of the command.
Invoked without any further arguments, the ls
command simply lists the contents of the current working directory. However,
you can also direct ls to list the contents of another directory by simply
adding the path (absolute or relative) of that directory on the command line. For example, continuing with
the example in Figure 4.1, when we are in the home directory (eriq)
we can see the directories/files
contained within Documents like so:
If you give paths to more than one directory as arguments to ls, then
the contents of each directory are listed after a heading line that gives
the directory’s path (as given as an argument to ls), followed by a colon. For example:
[~]--% ls Documents/git-repos Documents/work
Documents/git-repos:
ARCHIVED_mega-bioinf-pop-gen.zip  lowergranite_0.0.1.tar.gz
AssignmentAdustment/              mega-bioinf-pop-gen-examples/
CKMRsim/                          microhaps_np/

Documents/work:
assist/          maps/            oxford/          uw_days/
courses_audited/ misc/            personnel/
You might also note in the above example, that some of the paths listed within
each of the two directories are followed by a slash, /. This ls customization denotes that
they are directories themselves. Much like your command prompt, ls can be customized in ways
that make its output more informative. We will return to that in Section 4.5.
If you pass the path of a file to ls, and that file exists in your filesystem,
then ls will respond by printing the file’s path:
If the file does not exist you get an error message to that effect:
The multi-column, default output of ls is useful when you want
to scan the contents of a directory, and quickly see as many files
as possible in the fewest lines of output.
However, this output format is not well
structured. For example, you don’t know how many columns are going to be used in
the default output of ls (that
depends on the length of the filenames and the width of your terminal), and it
offers little information beyond the names of the files.
You can direct the ls command to provide more information, by using it with the -l
option (that is a lower case “L”, for “long”). Appropriately, with the -l option, the ls command will return
output in long format:
2019-02-08 21:09 /osu-chinook/--% ls -l
total 108
drwxr-xr-x  2 eriq kruegg  4096 Feb  7 08:26 bam
drwxr-xr-x 14 eriq kruegg  4096 Feb  8 15:56 bam-slices
-rw-r--r--  1 eriq kruegg 17114 Feb  7 20:16 bwa-run-list.txt
-rw-r--r--  1 eriq kruegg   824 Feb  6 14:14 fastq-file-prefixes.txt
-rw-r--r--  1 eriq kruegg     0 Feb  7 20:14 fqslice-22.error
-rw-r--r--  1 eriq kruegg     0 Feb  7 20:14 fqslice-22.log
-rwxr--r--  1 eriq kruegg  1012 Feb  7 07:59 map-etc.sh
-rwxr--r--  1 eriq kruegg  1138 Feb  7 20:56 map-sliced-fastqs-etc.sh
drwxr-xr-x  3 eriq kruegg  4096 Feb  7 13:01 play
-rwxr--r--  1 eriq kruegg  1157 Feb  8 15:08 REDOS-map-sliced-fastqs-etc.sh
drwxr-xr-x 14 eriq kruegg  4096 Feb  8 15:49 sliced
-rwxr--r--  1 eriq kruegg   826 Feb  7 20:09 slice-fastqs.sh
-rw-r--r--  1 eriq kruegg  1729 Feb  7 16:11 slicer-lines.txt
Each row contains information about only a single file.
The first column indicates what kind of file
each entry is, and also tells us which users have permission to
do certain things with the file (more on this in Section 4.4.8).
The third and fourth columns show that the owner of
each file is eriq, who is a user in the group called kruegg. After that
we see the size of the file (in bytes) and the date and time it was last modified.
There are a few options to ls that are particularly useful. One is -a, which causes
ls to include in its listing all files, even hidden ones. In a Unix file system,
any file whose name starts with a . is considered a hidden file. Commonly, such
files are configuration files or other files used by programs that you typically
don’t interact with directly. (We will see an example of this when we start working with git for version control, Section 11.2.) The -d option for ls is also
quite handy. Recall that when you provide the name of a directory as an argument to ls,
the default behavior is to list the contents of the directory. This can be troublesome
when you are listing the contents of a subdirectory: ls ~/Documents/git-repos/* lists the
contents (which can be substantial) of each of the directories in my git-repos directory, but
I might only want to know the name of each of those directories, rather than the full contents
of each diretory.
ls -d ~/Documents/git-repos will do that for you. Finally, the -R option to ls will cause the operating system to drill down, recursively into all the subdirectories of the one you
supplied to the command, and list their contents, as well.
4.2.5 Globbing
If you have ever had to move a large number of files of a certain type from one folder to another in a Finder window, you know that clicking and selecting each file and then individually dragging it could be a tedious task. Of course, in a graphical file browser your can select multiple files to move at once. Unix provides a similar system for operating upon multiple files at once; however it works a little differently, and is based on defining groups of files according to matching their names to certain patterns. This system, called filename expansion or “globbing,” quickly provides the names of a large number of files and paths, which let’s you operate on multiple files quickly and efficiently. In short, globbing allows for wildcard matching in path names. This means that you can specify multiple files that have names that share a common part, but differ in other parts.
The most widely used (and the most permissive) wildcard is the asterisk, *. It matches
anything in a file name. So, for example:
*.vcfwill expand to any files in the current directory with the suffix.vcf.D*swill expand to any files that start with an uppercaseDand end with ans.*output-*.txtwill expand to any files that include the phraseoutput-somewhere in their name and also end with.txt.*will expand to all files in the current working directory./usr/local/*/*.shwill expand to any files ending in.shthat reside within any directory that is within the/usr/localdirectory.
ls, unless you
use the -a option: ls -a.
After the asterisk, the next most commonly-used wildcard is the question mark, ?. The question mark
denotes any single character in a file name. For example. If you had a series of files that looked
like AA-file.txt, AB-file.txt, …, AZ-file.txt. You could get get all those by
using A?-file.txt. This would not expand to, for example, AAZ-file.txt, if that were in the directory.
You can be more specific in globbing by putting things within [ and ]. For example:
A[A-D]* would pick out any files starting with, AA, AB, AC, or AD. Or you could
have said A[a-d]* which would get any files starting with Aa, Ab, Ac, or Ad. And you
can also do it with numbers: [0-9]. You can also negate the contents of the [], with ^. Thus,
100_[^ABC]* picks out all files that start with 100_ followed by anything that is not an A, B, or a C.
Finally, you can be even more specific about replacements in file names by iterating over
different possibilities with a comma-separated list within curly braces. For example, img.{png,jpg,svg}
will iterate over the values in curly braces and expand to img.png img.jpg img.svg. Interestingly,
with curly braces, this forms all those file names whether they exist or not. So, unlike * it isn’t
really matching available file names.
The last thing to note about all of these globbing constructs is that they are not intimately
associated with the ls command. Rather, they simply provide expansions on the command
line, and the ls command is listing all those files. For example, try echo *.txt.
4.2.6 What makes a good file-name?
If the foregoing discussion suggests to you that it might not be good to use an
actual *, ?, [, or { in names that you give to files and directories
on your Unix system, then congratulations on your intuition! Although you can use
such characters in your filenames, they have to be preceded by a backslash, and it
gets to be a huge hassle. So don’t use them in your file names. Additionally,
characters such as #, |, and : do not play well for file names. Don’t use them!
Another pet peeve of mine (and anyone who uses Unix) are file names that have spaces in them.
In Windows and on a Mac it is easy to create file names that have spaces in them. In fact, the
standard Windows system comes with such space-containing directory names as My Documents or My Pictures. Yikes! Please don’t ever do that in your Unix life! One can deal with spaces in file
names, but there is really no reason to include spaces in your file names, and having spaces in file
names will typically break a good many scripts. Rather than a space, use an underscore, _, or a
dash, -. You must admit that, not only does My-Documents work better, but it actually
looks better too!
However, should you have to deal with files having spaces in their name, you can
address them by either backslash-escaping the spaces, or putting the whole
file name in quotation marks (single or double quotation marks will work).
If you have a file called dumb file name.jpg, you can address it on the
command line as either of the following three:
To make your life easier, however, the bottom line is that you should name your files
on a Unix system using only upper- and lowercase letters (Unix file systems are
case-sensitive), numerals, and the following three punctuation characters: ., -, and _.
Though you can use other punctuation characters, they often require special treatment, and it
is better to avoid them altogether.
4.3 The anatomy of a Unix command
Nearly every Unix command that you might invoke follows a certain pattern. First comes
the command itself. This is the word that tells the system the name of the command
that you are actually trying to do. After that, often, you will provide a series
of options that will modify the behavior of the command (for example, as we have seen, -l
is an option to the ls command). Finally, you might then provide some arguments to the
functions. These are typically paths to files or directories that you would like the
command to operate on. So, in short, a typical Unix command invocation will look
like this:
command options arguments
Of course, there are exceptions. For example, when invoking Java-based programs from your shell, arguments might be supplied in ways that make them look like options, etc. But, for the most part, the above is a useful way of thinking about Unix commands.
Sometimes, especially when using samtools or bcftools, the command part of the
command line might including a command and a subcommand, like samtools view or
bcftools query. This means that the operating system is calling the program
samtools (for example), and then samtools interprets the next token (view) to
know that it needs to run the view routine, and interpret all following
options in that context.
We will now break down each element in
command options arguments.
4.3.1 The command
When you type a command at the Unix prompt, whether it is a command like ls or
one like samtools (Section 19.4), the Unix system has to search around
the filesystem for a file that matches the command name and which provides the actual
instructions (the computer code, if you will) for what the command will actually do.
It cannot be stressed enough how important it is to
understand where and how the bash shell searches for these command files. Understanding this
well, and knowing how to add directories that the shell searches for executable
commands will alleviate a lot of frustration that often arises with Unix.
In brief, all Unix shells (and the bash shell specifically) maintain
an environment variable called PATH that is a colon-separated list of the pathnames
where the shell searches for commands. You can print the PATH variable using
the echo command:
On a freshly installed system without many customizations the PATH might look like:
which is telling us that, when bash is searching for a command, it searches for a file
of the same name as the command first in the directory /usr/bin. If it finds it there, then
it uses the contents of that file to invoke the command. If it doesn’t find it there,
then it next searches for the file in directory /bin. If it’s not there, it searches
in /usr/sbin, and finally in /sbin. If it does not find the command in any of those directories
then it returns the error command not found.
When you install programs on your own computer system, quite often the installer will modify
a system file that specifies the PATH variable upon startup. Thus after installing some
programs that use the command line on a Mac system, the “default” PATH might look like:
4.3.2 The options
Sometimes these are called flags, and they provide a convenient way of
telling a Unix command how to operate. We have already seen a few of them,
like the -a, -l or -d options to ls.
Most, but not all, Unix tools follow the convention that options specified by a single
letter follow a single dash, while those specified by multiple letters follow two dashes.
Thus, the tar command takes the single character options -x, -v, and -f, but also takes
an option named like --check-links. Some utilities also have two different names—a single-letter
name and a long name—for many options.
For example, the bcftools view program uses either -a or --trim-alt-alleles to invoke the option
that trims alternate alleles not seen in a given subset of individuals. Other tools, like BEAGLE, are perfectly content to
have options that are named with multiple letters following just a single dash.
Sometimes options take parameter values, like bcftools view -g het. In that case, het is
a parameter value. Sometimes the parameter values are added to the option with an equals-sign.
With some unix utilities’ single-letter options can be bunged together
following a single dash, like, tar -xvf being synonymous with tar -x -v -f. This
is not universal, and it is not recommended to expect it.
Holy Cow! This is not terribly standardized, and probably won’t make sense until you really get in there and starting playing around in Unix…
4.3.3 Arguments
These are often file names, or other things that are not preceded by an option flag.
For example, in the ls command:
-lrt is giving ls the options -l, -r, and -t and dir3 is the argument—the
name of the directory whose contents you should list.
4.3.4 Getting information about Unix commands
Zheesh! The above looks like a horrible mish-mash. How do we find out how to use/invoke different commands and programs in Unix? Well, most programs are documented, and you have to learn how to read the documentation.
If a Unix utility is properly installed, you should be able to find its manual page with
the man command. For example, man ls or man tar. These “man-pages”, as the
results are called, have a fairly uniform format. They start with a summary of what the
utility does, then then show how it is invoked and what the possible options are by
showing a skeleton in the form:
“command options arguments”
and usually square brackets are put around things that are not required. This format
can get quite ugly and hard to parse for an old human brain, like mine, but stick with it.
If you don’t have a man-page for a program, you might try invoking the program with
the --help option, or maybe with no option at all. Sometimes, that returns a textual
explanation of how the program should be invoked, and the options that are avaiable.
4.4 Handling, Manipulating, and Viewing files and streams
In Unix, there are two main types of files: regular files which are things like text files, figures, etc.—Anything that holds data of some sort. And then there are “special” files, which include directories which you’ve already seen, and symbolic links which we will talk about later.
4.4.1 Creating new directories
You can make a new directory with:
where path is a path specification (either absolute or relative). Note that if you
want to make a directory within a subdirectory that does currently not exist, for example:
when new-dir does not already exist, then you have to either create new-dir first, like:
or you have to use the -p option of mkdir, which creates all necessary parent directories
as well, like:
If there is already a file (regular or directory) with the same path specifiation as a directory you are
trying to create, you will get an error from mkdir (unless you are using the -p option,
in which case mkdir doesn’t do anything, but neither does it complain about the fact that a
directory already exists where you wanted to make one).
4.4.2 Fundamental file-handling commands
For the day-to-day business of moving, copying, or removing files in the file system, the three main Unix commands are:
mvfor moving files and directoriescpfor copying files and directoriesrmfor removing files and directories
These obviously do different things, but their syntax is somewhat similar.
4.4.2.1 mv
mv can be invoked with just two arguments like:
mv this therewhich moves the file (or directory) from the path this to the path there.
- If
thisis a regular file (i.e. not a directory), and:thereis a directory,thisgets moved inside ofthere.thereis a regular file that exists, thentherewill get overwritten, becoming a regular file that holds the contents ofthis.theredoes not exist, it will be created as regular file whose contents are identical to those ofthis.
- If
thisis a directory and:theredoes not exist in the filesystem, the directorytherewill be made and its contents will be the (former) contents ofthis- if
therealready exists, and is a directory, then the directorythiswill be moved inside of the directorythere(i.e. it will becomethere/this). - if
therealready exists, but is not a directory, then nothing will change in the filesystem, but an an error will be reported. In all cases, whatever used to exist at paththiswill no longer be found there.
And mv can be invoked with multiple arguments, in which case the last one must be a directory
that already exists that receives all the earlier arguments inside it. So, if you already have
a directory named dest_dir then you can move a lot of things into it like:
You can also write that as as
which makes its meaning a little more clear, but there is no requirement that the
final argument have a trailing /.
Note, if any files in dest_dir have the same name as the files you are moving into
dest_dir they will get overwritten.
So, you have must be careful not to overwrite files that you don’t want to overwrite.
Using mv can be dangerous in that way.
4.4.2.2 cp
This works much the same way as mv with two different flavors:
and
The result is very much like that of mv, but instead of moving the file
from one place to another (an operation that can actually be done without moving the
data within the file to a different place on the hard drive), the cp command actually
makes a full copy of files. Note that, if the files are large, this can take a long time.
4.4.2.3 rm
Finally we get to the very spooky rm command, which is short for “remove.” If you
say “rm myfile.txt” the OS will remove that file from your hard drive’s directory. The data
that were in the file might live on for some time on your hard drive—in other words, by default,
rm does not wipe the file off your hard drive, but simply “forgets” where to look for that file. And
the space that file took up on your hard drive is no longer reserved, and could easily be
overwritten the next time you write something to disk. (Nonetheless, if you do rm a file, you should never expect to be able to get it back). So, be very careful about using rm. It takes an -r option for recursively removing directories and all of
their contents.
When used in conjunction with globbing, rm can be very useful. For example, if you wanted
to remove all the files in a directory with a .jpg extension, you would do rm *.jpg from
within that directory. However, it’s a disaster to accidentally remove a number of files you
might not have wanted to. So, especially as you are getting familiar with Unix, it is
worth it to experiment with your globbing using ls first, to see what the results are,
and, only when you are convinced that you won’t remove any files that you do not
want to trash, should you
then use rm to remove those files.
4.4.3 “Viewing” Files
When using a Graphical User Interface, or GUI,
when you interact with files on your computer,
you typically open the files with some application. For example, you open Word files
with Microsoft Word. When working on the Unix shell, that same paradigm does not
really exist. Rather, (apart from a few cases like the text editors, nano, vim and
emacs) instead of opening a file and letting the user interact with it, the shell is
much happier just streaming the contents of the file to the terminal.
The most basic of such commands is the cat command, which catenates the contents
of a file into a very special data stream called stdout, which is short
for “standard output.” If you don’t provide any other instruction, data that gets
streamed to stdout just shoots by on your terminal screen. If the file is very large, it might
do this for a long time. If the file is a text file then the data in it can be
written out in letters that are recognizable. If it is a binary file then there is
no good way to represent the contents as text letters, and your screen will be filled with
all sorts of crazy looking characters.
It is generally best not to cat very large files, especially binary ones. If you do and
you need to stop the command from continuing to spew stuff across your screen, you can type
cntrl-c which is the universal Unix command for “kill the current process happening on the
shell.” Usually that will stop it.
Sometimes you want to just look at the top of a file. The head command
shows you the first 10 lines of a file. That is valuable. The less command
shows a file one screenful at a time. You can hit the space bar to see the next screenful,
and you can hit q to quit viewing the file. If the file has very long lines
(as might be the case with a VCF file) then you can give less the -S option
to not wrap lines. In that case, the left and right arrow keys can be used to
scroll through the long lines.
Try navigating to a file and using cat, head, and less on it.
One particularly cool thing about cat is that if you say
it will catenate the contents of both files, in the order they are listed on the command line, to stdout.
Now, one Big Important Unix Fact is that many programs written to run in the
Unix shell behave in the same way regarding their output: they write their
output to stdout. We have already seen this with ls: its output just
gets written to the screen, which is where stdout goes by default.
4.4.4 Redirecting standard output: > and >>
Unix starts to get really fun when you realize that you can “redirect” the
contents of stdout from any command (or group of commands…see the next chapter!)
to a file. To do that, you merely follow the command (and all its options and arguments)
with > path where path is the path specifying the file into which you
wish to redirect stdout.
Witness, try this:
# echo three lines of text to a file in the /tmp directory
echo "bing
bong
boing" > /tmp/file1

# echo three more lines of text to another file
echo "foo
bar
baz" > /tmp/file2

# now view the contents of the first file
cat /tmp/file1

# and the second file:
cat /tmp/file2
It is important to realize that when you redirect output into a file
with >, any contents that previously existed in that file will
be deleted (wiped out!). So be careful about redirecting. Don’t
accidentally redirect output into a file that has valuable data in it.
The >> redirection operator does not delete the destination file before
it redirects output into it. Rather, >> file means “append stdout to the contents that already exist in file.” This can be very useful
sometimes.
4.4.5 stdin, < and |
Not only do most Unix-based programs deliver output to standard output, but most utilities can also receive input from a file stream called stdin which is short for “standard input.”
If you have data in a file that you want to send into standard input
for a utility, you can use the < like this:
But, since most Unix utilities also let you specify the file as an argument, this is not used very much.
However, what is used all the time in Unix, and it is one of the things
that makes it super fun, is the pipe, |, which says, “take stdout coming
out of the command on the left and redirect it into stdin going into
the command on the right of the pipe.
For example, if I wanted to count the number of files and directories stored in my git-repos
directory, I could do
which pipes the output of ls -dl (one line per file) into the stdin for the wc command, which
counts the number of lines, words, and letters sent to its standard input. So, the output tells
me that there are 174 files and directories in my directory Documents/git-repos.
Note that pipes and redirects can be combined in sequence over multiple operations or commands. This is what gives rise to the terminology of making “Unix pipelines:” the data are like streams of water coming into or out of different commands, and the pipes hook up all those streams into a pipeline.
4.4.6 stderr
While output from Unix commands is often written to stdout, if anything goes wrong with
a program, then messages about that get written to a different stream called stderr, which, you
guessed it! is short for “standard error”. By default, both stdout and stderr get written
to the terminal, which is why it can be hard for beginners to think of them as separate streams.
But, indeed, they are. Redirecting stdout with >, that does not redirect stderr.
For example. See what happens when we ask ls to list a file that does not exist:
The error message comes back to the screen. If you redirect the output it still comes back to the screen!
If you want to redirect stderr, then you need to specify which stream
it is. On all Unix systems, stderr is stream #2, so the 2> syntax can be
used:
Then there is no output of stderr to the terminal, and when you cat the output
file, you see that it went there!
Doing bioinformatics, you will find that there will be failures of various programs. It is essential when you write bioinformatic pipelines to redirect stderr to a file so that you can go back, after the fact, to sleuth out why the failure occurred. Additionally, some bioinformatic programs write things like progress messages to stderr so it is important to know how to redirect those as well.
4.4.7 Symbolic links
Besides regular files and directories, a third type of file in Unix is called a symbolic link. It is a special type of file whose contents are just an absolute or a relative path to another file. You can think of symbolic links as “shortcuts” to different locations in your file system. There are many useful applications of symbolic links.
Symbolic links are made using the ln command with the -s option. For example,
if I did this in my home directory:
then srs becomes a file whose full listing (from ls -l srs) looks like:
4.4.8 File Permissions
Unix systems often host many different users. Some users might belong to the same research group, and might like to be able to read the files (and/or use the programs) that their colleagues have in their accounts.
The Unix file system uses a system of permissions that gives rights to various
classes of users to read, write, or execute files. The permissions associated with
a file can be viewed using ls -l. They are captured in the first column which might
look something like -rwxr-xr-x. When you first start looking at these, they can
be distressingly difficult to visually parse. But you will get better at it! Let’s
start breaking it down now.
The file description string, in a standard Unix setting, consists of 10 characters.
- The first tells what kind of file it is:
-= regular file,d= directory,l= symbolic link. - The next group of three characters denote whether the owner/user of the file has
permission to either read, write, or execute the file.
- The following two groups of three characters are the same thing for users within the users group, and for all other users, respectively.
Here is a figure from the web that we can talk about:

Permissions can be changed with the chmod command. We will talk in class about
how to use it with the octal representation of permissions.
4.5 Customizing your Environment
Previously we saw how to modify your command prompt to tell you what the current
working directory is (remember PS1='[\W]--% '). The limitation of giving that
command on the command line is that if you logout and then log back in again, or open
a new Terminal window, you will have to reissue that command in order to achieve
the desired look of your command prompt. Quite often a Unix user would like to make
a number of customization to the look, feel, and behavior of their Unix shell.
The bash shell allows these customization to be specified in two different files that
are read by the system so as to invoke the customization. The two files are hidden files
in the home directory: ~/.bashrc and ~/.bash_profile. They are used by the Unix system
in two slightly different contexts, but for most purposes, you, the user, will not need or
even want to distinguish between the different contexts. Managing two separate files
of customization is unnecessary and requires duplication of your efforts, and can lead to inconsistent
and confusing results, so here is what we will do:
- Keep all of our customization in
~/.bashrc. - Insert commands in
~/.bash_profilethat say, “Hey computer! If you are looking for customization in here, don’t bother, just get them straight out of~/.bashrc.
We take care of #2, by creating the file ~/.bash_profile to have the following
lines in it:
Taking care of #1 is now just a matter of writing commands into ~/.bashrc. In the following
are some recommended customization.
4.5.1 Appearances matter
Some customization just change the way your shell looks or what type of output
is given from different commands. Here are some lines to add to your ~/.bashrc
along with some discussion of each.
This gives a tidier and more informative command prompt. The export command before
it tells the system to pass the value of this environment variable, PS1, along
to any other shells that get spawned by the current one.
This makes it so that each time you invoke the ls command, you do so with the
options -G, -F, and -h. To find out on your own what those options do, you can
type man ls at the command line and read the output, but briefly: -G causes directories and
different file types to be printed in different colors, -F causes a / to be printed after
directory names, and other characters to be printed at the end of the names of different
file types, and -h causes file sizes to be printed in an easily human-readable form when
using the -l option.
4.5.2 Where are my programs/commands at?!
We saw in Section 4.3.1 that bash searches the directories listed in the
PATH variable to find commands and executables. You can modify the PATH variable to include
directories where you have installed different programs. In doing so, you want to make sure
that you don’t lose any of the other directories in PATH, so there is a certain way to
go about redefining PATH. If you want to add the path /a-new/program/directory to your
PATH variable you do it like this:
4.6 A Few More Important Keystrokes
If a command “gets stuck” or is running longer than it should be, you can usually
kill/quit it by doing cntrl-c.
Once you have given a command, it gets stored in your bash history. You can use the up-arrow key to cycle backward through different commands in your history. This is particularly useful if you are building up complex pipelines on the command line piece by piece, looking at the output of each to make sure it is correct. Rather than re-typing what you did for the last command line, you just up-arrow it.
Once you have done an up-arrow or two, you can cycle back down through your history with a down-arrow.
Finally, you can search through your bash history by typing cntrl-r and then typing
the word/command you are looking for. For example, if, 100 command lines back, you
used a command that involved the program awk, you can search for that by typing
cntrl-r and then typing awk.
One last big thing to note: the # is considered a comment character in bash.
This means that any text following a # (unless it is backslash-escaped or inside quotation marks),
until the next line ending,
will be ignored by the shell.
4.7 A short list of additional useful commands.
Everyone should be familiar with the following commands, and the options that follow them on each line below. One might even think of scanning the manual page for each of these:
echocathead,-n, -ctail,-nless,-Ssort,-n -b -kpastecut,-dtar,-cvf, -xvfgzip,-cdu,-h -C,wcdateuniqchmod,u+x,ug+xgrep
4.8 Two important computing concepts
4.8.1 Compression
Most file storage types (like text files) are a bit wasteful in terms of
file space: every character in a text file takes the same number of bytes to
store, whether it is a character that is used a lot, like s or e, or whether
it is a character that is seldom seen in many text files, like ^. Compression
is the art of creating a code for different types of data that uses fewer bits to
encode “letters” (or “chunks” of data) that occur frequently and it reserves codewords of
more bits to encode less frequently occurring chunks in the data. The result is that the
total file size is smaller than the uncompressed version. However, in order to read it,
the file must be decompressed.
In bioinformatics, many of the files you deal with will be compressed, because that
can save many terabytes of disk space. Most often, files will be compressed using the
gzip utility, and they can be uncompressed with the gunzip command. Sometimes
you might want to just look at the fist part of a compressed file. If the file is compressed
with gzip, you can decompress to stdout by using gzcat and then pipe it to head, for example.
A central form of compression in bioinformatics is called bgzip compression
which compresses files into a series of blocks of the same size, situated in such a way that
it is possible to index the contents of the file so that certain parts of the file can be
accessed without decompressing the whole thing. We will encounter indexed compressed files a
lot when we start dealing with BAM and vcf.gz files.
4.8.2 Hashing
The final topic we will cover here is the topic of hashing, an in particular the idea of “fingerprinting” files on ones computer. This process is central to how the git version control system works, and it is well worth knowing about.
Any file on your computer can be thought of as a series of bits, 0’s and 1’s, as, fundamentally, that is what the file is. A hashing algorithm is an algorithm that maps a series of bits (or arbitrary length) to a short sequence of bits. The SHA1 hashing algorithm maps arbitrary sequences of bits to a sequence of 160 bits.
There are \(2^{160} \approx 1.46 \times 10^{48}\) possible bit sequences of length 160. That is a vast number. If your hashing algorithm is well randomized, so that bit sequences are hashed into 160 bits in a roughly uniform distribution, then it is exceedingly unlikely that any two bit sequences (i.e. files on your filesystem) will have the same hash (“fingerprint”) unless they are perfectly identical. As hashing algorithms are often quite fast to compute, this provides an exceptionally good way to verify that two files are identical.
The SHA1 algorithm is implemented with the shasum command. In the following,
as a demonstration, I store the recursive listing of my git-repos directory into
a file and I hash it. Then I add just a single line ending to the end
of the file, and hash that, to note that the two hashes are not at all similar
even though the two files differ by only one character:
[~]--% ls -R Documents/git-repos/* > /tmp/gr-list.txt
[~]--% # how many lines is that?
[~]--% wc /tmp/gr-list.txt
   93096   88177 2310967 /tmp/gr-list.txt
[~]--% shasum /tmp/gr-list.txt
1396f2fec4eebdee079830e1eff9e3a64ba5588c  /tmp/gr-list.txt
[~]--% # now add a line ending to the end
[~]--% (cat /tmp/gr-list.txt; echo) > /tmp/gr-list2.txt
[~]--% # hash both and compare
[~]--% shasum /tmp/gr-list.txt /tmp/gr-list2.txt
1396f2fec4eebdee079830e1eff9e3a64ba5588c  /tmp/gr-list.txt
23bff8776ff86e5ebbe39e11cc2f5e31c286ae91  /tmp/gr-list2.txt
[~]--% # whoa! cool.
4.9 Unix: Quick Study Guide
This is just a table with quick topics/commands/words in it. You should understand each and be able to tell a friend a lot about each one. Cite it as 4.1
| bash | absolute path | relative path |
/ at beginning of path |
/ between directories |
home directory |
~ |
current working directory | pwd |
cd |
. |
.. |
cd - |
basename | PS1 |
| TAB-completion | ls (-a, -d, -R) |
globbing |
| * | ? | [0-9] |
| [a-z] | [^CDcd] | {png,jpg,pdf} |
echo |
man command |
mkdir |
mv |
cp |
rm |
cat |
head |
less (-S) |
| stdout | stdin | stderr |
> |
< |
| |
ln -s |
symbolic link | PATH |
-rw-r--r-- |
.bashrc | .bash_profile |
sort, -n -b -k |
paste |
cut, -d |
tar, -cvf, -xvf |
gzip |
du, -h -C, |
wc |
date |
uniq |
| cntrl-c | cntrl-r | # |
| up-arrow/down-arrow | chmod, ug+x, 664 |
grep |