Branching and Merging
What the heck is a branch?
Note that the motto for git is “local branching on the cheap,” so branches must be important

- A branch is a “lightweight pointer to a commit”…What?
Let’s refresh our memory on what commits, trees, and blobs are.
Data structure within the .git folder
Note: the next four diagrams are from Scott Chacon’s ProGit book and are used under the CC Noncommercial 3.0 Attribution license. I took them from here
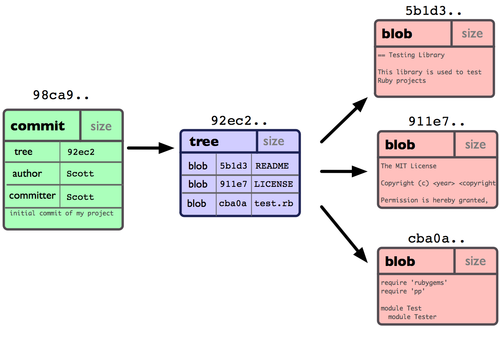
- Contents of (different versions of) files in your repository are stored in blobs
- (Sub)directory structure (locations of files in your repository) stored in trees
- The tree and the blobs referenced in it constitute the “snapshot” of the repository.
- Commits: for a given snapshot, points to a tree, has a comment, an author, a committer, and
- Unless it is the first commit, it has a pointer to a parent.
A chain or sequence of commits
Commits form a chain by connecting to their parents.
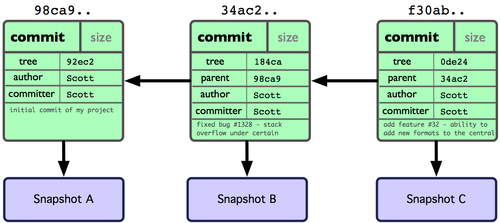
- The arrows between commits point to parents. Thus the later commits are on the right, and the earlier commits on the left.
- This is critical: every commit knows where it came from (the previous commit).
Just as a genealogy (i.e., links to parents) gives your family history, so too do the commits and the links from each commit to its parent(s) constitute the version history of your repository.
Easy access to commits
- Commits would not be useful if they were just stored in the .git directory of your repository with no way to access them.
- Branches are how you access commits so that you can:
- Check them out (be able to access their contents)
- Modify the contents and make a new commit
- They are “lightweight” in that they don’t take up much space (each branch is just a file with the sha-1 hash of a commit in it)
Upon initialization, every repository gets a branch called master
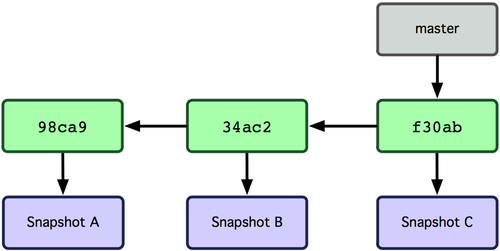
It is customary to let master be where your stable, deployable code is kept.
What it means to be on a branch
- If you are on a branch, (say master for the sake of argument) that means that
- There is a commit pointed to by master. (Let’s say it is 8e334ab3)
- Any changes you make, when staged and committed will create a new commit whose parent (in this case) is 8e334ab3.
In git, if you are on a branch, then the HEAD points to that branch.
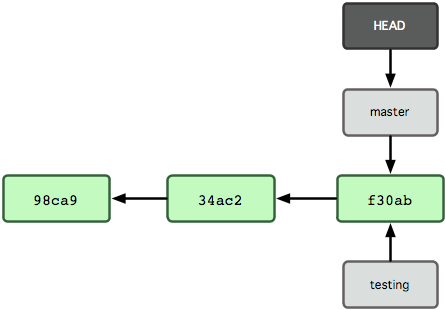
- Hey, there are two branches pointing to the same commit!
- That is just fine. You can have as many branches as you want pointing to a commit.
- Question. If changes are committed now, what happens to the two branches? This is crucial…
Creating and using branches
Creating a branch called “testing”
In the shell, when you type
git will make a new branch for you namedgit branch some-namesome-name.- It will point to whatever commit HEAD currently points to. (i.e. the branch that you are currently on.)
- Let’s do this together.
- Create a new rstudio project with version control:
- File -> New Project -> New Directory -> Empty Project
- Let the directory name be
branchyand make it a subdirectory of Desktop. - Important: check the box to “create a git repository”
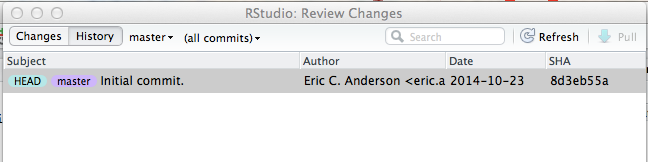
- At this point there are no commits. Stage
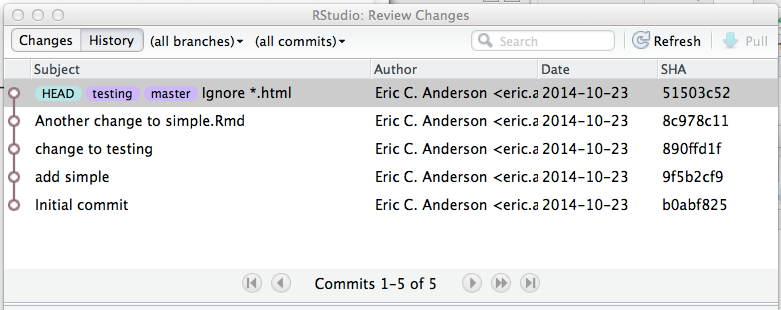
.gitignoreandbranchy.Rprojand commit them. Look at the “diff” / History window, and notice that there is one commit and HEAD and master are at it:
Let’s “move master forward” by making a new .Rmd file called
simple.Rmdand committing it. Now our history looks like: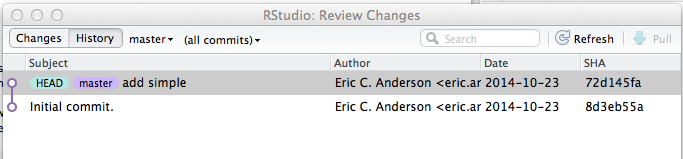
Now, let’s make a new branch called testing. In the shell (in the correct directory):
git branch testing
Notice that RStudio’s git-history shows us that HEAD, master, and testing, all now point to the same commit. (You might have to hit the refresh button). They all have the same parent and history too.
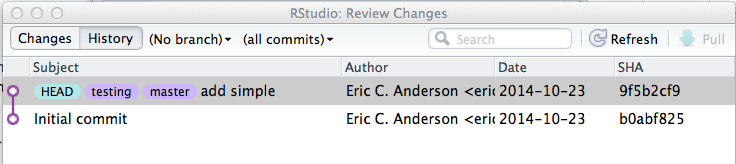
- However the visual there doesn’t tell us which branch we are one (where HEAD is attached.)
No worries, upper right of the git pane tells us. We should still be on master because we have not “checked-out” the testing branch yet.

- Create a new rstudio project with version control:
Checking out a branch
If we want to be on a branch we need to “check that branch out”. Either:
in the shell, or use the dropdown menu by clicking on the Branch Indicator in RStudio.git checkout testing- In this case nothing exciting happened because testing and master both point to the same commit.
- If testing had pointed to a different commit, the state of the files in your working area might have changed.
- What if you had uncommitted changes on some of the files that changed?!!
- Thankfully, git does not let you overwrite unstored changes when you switch branches. (More on this later.)
Make some changes on the testing branch
- Make sure you are the testing branch
- Add some text to the bottom of simple.Rmd
- Stage that file and commit it
- Don’t stage the “simple.html” file.
Make some more changes to the testing branch
- Add some more text to the bottom. Stage and commit.
- Don’t stage the html file.
Make even more changes to the testing branch
- Modify the
.gitignorefile so git ignores all files that end in.htmlin your repo.
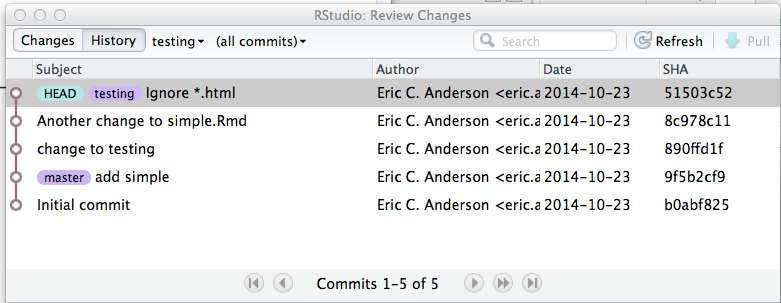
Now look at your commit history
Your testing branch has left master in the dust!
- What if, after all of this, we decide that our testing branch is good stuff and we want to add the changes in testing to master so we can deploy it, etc?
This is where merging comes in.
Merging branches
The basic idea of a merge:
- Switch to the branch that you want to add the stuff into
- Tell it to merge in changes from another branch (or branches)
- Sometimes this is easy (fast-forward merges)
- Sometimes it is more complicated, if both branches have changed from their common parent. But, git takes care of most of the details
Simplest case = Fast-forward merge
- To merge testing into master is simple because master is a direct ancestor of testing.
- Here is how you do it:
- Switch to the master branch (best to make sure your working area is clean)
In the shell (in a directory within the
branchyrepo) type this:git merge testing
git should tell you that it must made a fast-forward merge:
Updating 9f5b2cf..51503c5
Fast-forward
 .gitignore |  1 +
 simple.Rmd | 24 ++++++++++++++++++++++++
 2 files changed, 25 insertions(+)
Look at your history diagram again
- You might have to hit the “Refresh” button in the “RStudio: Review Changes” window.
- See that all that happened is that the master branch has been brought up to where the testing branch is.
No new commits were generated
We can delete testing now if we want
master points to the same place, so it is redundant.
git branch -d testingIf a branch is not redundant, git won’t let you delete it with the -d option (have to use -D, but be careful you don’t lose track of work that you would like to merge in at some point.)
Harder case, both branches in the merge have moved forward
- Requires a “3-way-merge”
- 3 commits involved: the two branches and their common ancestor.
- Git takes care of the difficulties here (finding the “merge base”, etc.)
- This creates a new commit. This is as it must and should be!
Let’s create the need for a 3-way merge
Note, through all of this, do not be amending your previous commits.
- Make a new branch called changes-on-bottom and check it out.
Note: if you want to simultaneously create a new branch named changes-on-bottom and check it out at the current HEAD location. You can just do this:
git checkout -b changes-on-bottom
- Add stuff to
simple.Rmdto the bottom of the file. Commit. - Delete some of the stuff you just added. Commit.
- Add even more to the bottom of the file. Commit.
- Now checkout master to make changes on the master branch. Notice that your file has been “rolled back” to its state on the master branch.
- Add some stuff to the top part of the file. commit.
- Remove half of what you just added. Commit.
- Add some more to the top. Commit.
Now, look at your history
Be sure to choose “all branches” to the right of the “History” button:
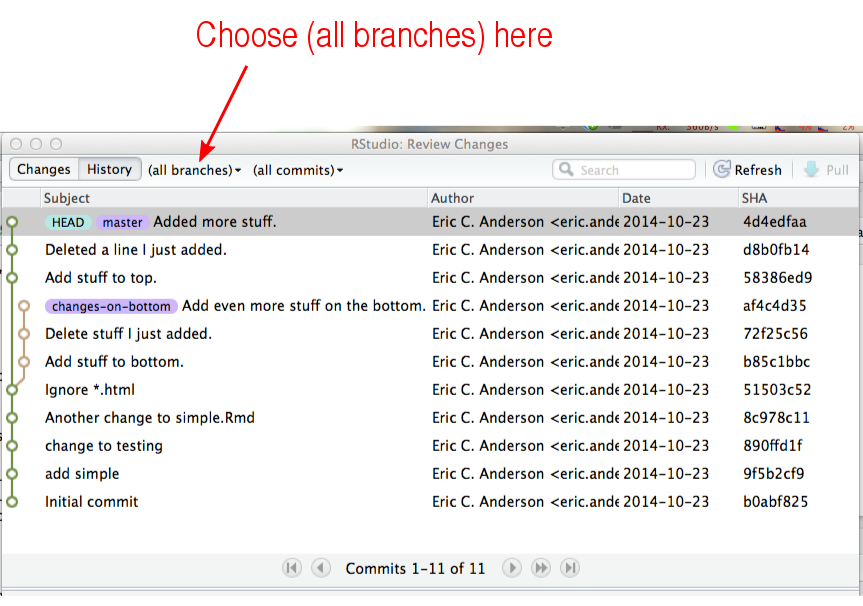
- It sort of looks like master is ahead of changes-on-bottom but it isn’t.
They are diverging independently
Will we be able to merge these?
- Both branches change the same file, BUT,
- That is not a problem unless the same line in the same file has been changed in the different branches being merged.
Let’s merge them into the master branch
- The command is the same:
- Make sure you are on the master branch
Use the
git mergecommand:git merge changes-on-bottom
- It will pop up an editor for you to write a commit message
- This might fail if you don’t have an editor set up.
- If you get emacs and are unfamiliar with it, this will take some explanation.
- git expects you to write a commit message because this is a non-trivial merge—it has to make a new commit because it is not equivalent to any previous commit (unlike in the fast-forward case).
- git provides a basic message (pre-written) in the editor window.
- all you have to do is save the file and that message will be commit message.
- in the
nanoeditor,^X(cntrl-x) is the key sequence to exit the file.- if you haven’t modified the file at all, hitting
^Xshould just save the file and exit. - if you have modified the file
nanowill ask if you want to save it (say Yes), and then hit return to save it with the filename recommended (and, actually, required, by git).
- if you haven’t modified the file at all, hitting
- in the
Now, check out your history
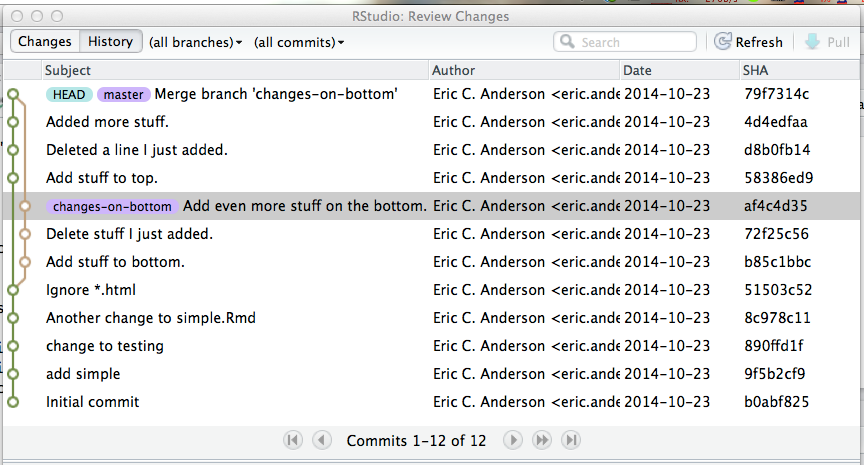
- There is a new commit in there and it has two parents.
- Whoa! The changes-on-bottom branch did not move forward.
- You could delete changes-on-bottom now, OR you could continue to modify it (it won’t have the changes you did on master) and merge those in later. Let that me a fun weekend mission for the motivated…explore what happens.
For next git session
- When git won’t let you checkout a branch
- Stashing
- Merge conflicts, and resolving them
- Remotes
If we have time today
- It is really fun to browse the version history for Hadley’s advanced R book.
- For fun: make a new project that is a clone of it and look at its history and try to understand it.
comments powered by Disqus